

WARNING: Fake blood
The weather’s getting colder, trees are changing colours and you know what that means … Halloween is coming soon! With this fall season looking a bit less socially isolated than last year’s, I’m sure many of you are already in the midst of planning what costume to show off to your friends. If you’re stumped like me and would rather put more effort into some makeup than splurging on an entire costume, here are five looks for you to try this month!
This look is super cute and easy (especially if you’ve got your signature cat-eye down)! You can choose any colour palette you want to accompany the eyeliner, but I went with a deep purple smokey eye, since orange and purple are usually what I think of for Halloween.
I started by using a white base to ensure the purple would stand out enough from the black eyeliner—my personal favourite is the NYX Jumbo Liner in the shade “Milk,” as it’s quite sticky and really helps adhere eyeshadow to the lid. Then, I smoked out a light purple in my crease as a transition shade, added a tiny bit of black to the outer portions of my crease to build dimension and popped a bright purple on the rest of my eyelid.
For the eyeliner, I started off with a traditional cat-eye, including a small “v” in the inner corner of my eye for an elongating illusion. Then, I simply used my eyeliner to create four lines extending out of the outer corner of my eye and attached them with a web design. To top it off, I added a small spider hanging down from the web and a black lip to match (which I used black eyeliner for).
This is super cute, easy to replicate and a classic Halloween look you’ve likely seen plenty of times online if you’re an avid Pinterest user.
Products used:
Suva Beauty Hydra Liner in shade Doodle
NYX Eye Pencil in shade Black
Anastasia Beverly Hills Norvina Pro Pigment Palette (Vol. 2), shades 3C, D5, E5
Sephora “Swanky” false lashes
L’Oréal Paris Voluminous Lash Paradise mascara in shade Blackest Black
Anastasia Beverly Hills Brow Wiz in shade Medium Brown
Rare Beauty Liquid Touch Weightless Foundation in shade 130N
e.l.f. Cosmetics Hydrating Satin Camo Concealer in shade Light Warm
Maybelline Fit Me! translucent loose powder
This is easily one of the simplest special effects looks you can do for Halloween. If you’re looking to combine something glamorous and gory, this is perfect for you! It’s quick, just a little bit gross and doesn’t have to be done perfectly to look realistic. In fact, the messier the better.
I avoided using a lot of eyeshadow on my lid, as I wanted the focus to be the “cut” crease. So, I outlined where I wanted to position the “cut” with a light brown to begin, then blended it out slightly with a darker brown and purple to mimic a bit of bruising. I did smudge a small amount of black eyeshadow along my top lash line to extend out into a tiny smokey wing, but that’s totally optional. I carried it down onto my bottom lash line, put some black eyeliner in my waterline, and the base was complete
As for the actual “cut,” this is where some DIY-ers may have some fun. As Halloween only comes once a year, I don’t usually have fake blood on hand, so I made my own! A bit of a flashback to my high school theatre club reminded me that mixing chocolate syrup and red food colouring does the trick. I used a small paint brush to “cut” my crease, popped on some lashes and finished the look by smudging a bit of mascara around my eyes.
Products used:
DIY fake blood (chocolate syrup and red food colouring)
NYX Eye Pencil in Black
Urban Decay Naked 2 Basics eyeshadow palette
Anastasia Beverly Hills Norvina Pro Pigment Palette (Vol. 2), shades D5, E4, E5
Sephora “Celebrity” false lashes
L’Oréal Paris Voluminous Lash Paradise mascara in shade Blackest BlackAnastasia Beverly Hills Brow Wiz in shade Medium Brown
Rare Beauty Liquid Touch Weightless Foundation in shade 130N
e.l.f. Cosmetics Hydrating Satin Camo Concealer in shade Light Warm
Maybelline Fit Me! translucent loose powder
This look is inspired by a Facebook photo filter and I love how it translated into an actual makeup look. It may look difficult, but I promise it’s a lot easier than it seems to recreate!
I picked up the brightest colours I had and blended them in no particular pattern onto half of my face. I created a very simple pink and purple smokey eye, transitioning the purple on my outer corner into a blue on my cheekbone and under-eye area. Under my lower lash line, I blended a green from the blue on my cheekbone and popped some yellow into my inner corner for a highlight. I decided to make my eyebrow pink too, which really helped tie the colours together!
For the skull outline, I used a light blue eyeliner to lightly sketch exactly where I wanted them to go before going in with a white liquid liner. This is a handy trick to ensure you don’t mess up and have to start all over again (and this works for regular eyeliner too, if you just use a light brown). Once I was happy with the shape, I used a white liner to create a nice fine line, allowing the lighter blue to be exposed underneath for a cool neon light effect. I carried the lines over a bright lipstick I had already applied, drew an outline of some teeth and placed three lines down my nose as well.
For the other half of my face, I left it looking pretty natural to create a really cool contrasting effect. Using different false eyelashes on each eye, putting a contact into the “skull” side eye and even wearing a split-dye wig are really great options to enhance this effect. This look is definitely one of my favourites and would turn tons of heads at a get-together!
Products used:
NYX Epic Wear liner stick in shade Chill Blue
NYX Liquid Liner in shade White
Anastasia Beverly Hills Norvina Pro Pigment Palette (Vol. 2), shades A2, B2, B3, C3, D3, D4
BH Cosmetics Take Me Back To Brazil eyeshadow palette
Sephora “Vivacious” false lashes
L’Oréal Paris Voluminous Lash Paradise mascara in shade Blackest Black
Anastasia Beverly Hills Brow Wiz in shade Medium Brown
Rare Beauty Liquid Touch Weightless Foundation in shade 130N
e.l.f. Cosmetics Hydrating Satin Camo Concealer in shade Light Warm
Maybelline Fit Me! translucent loose powder
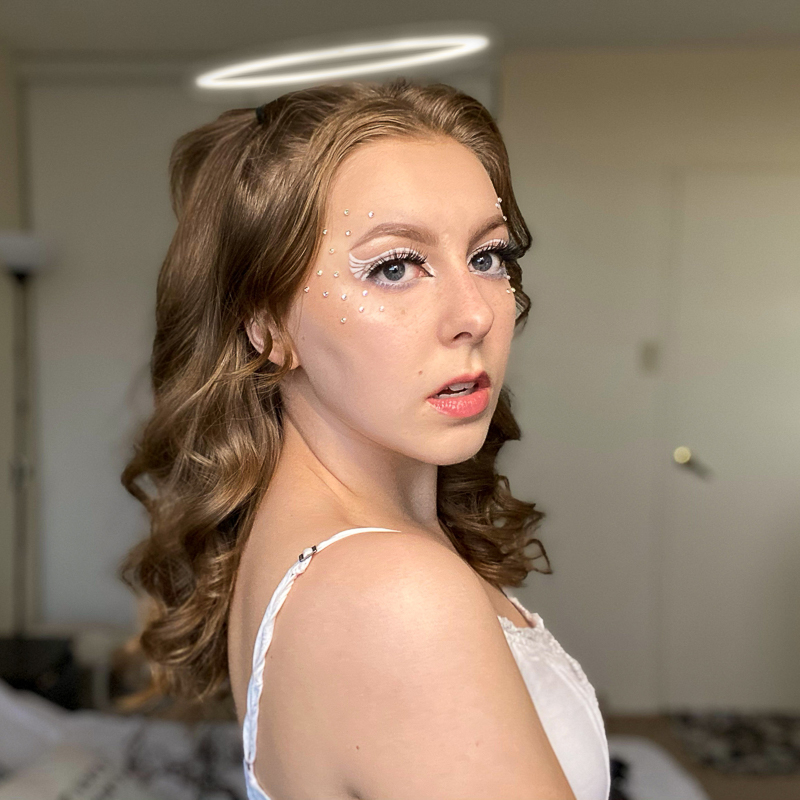
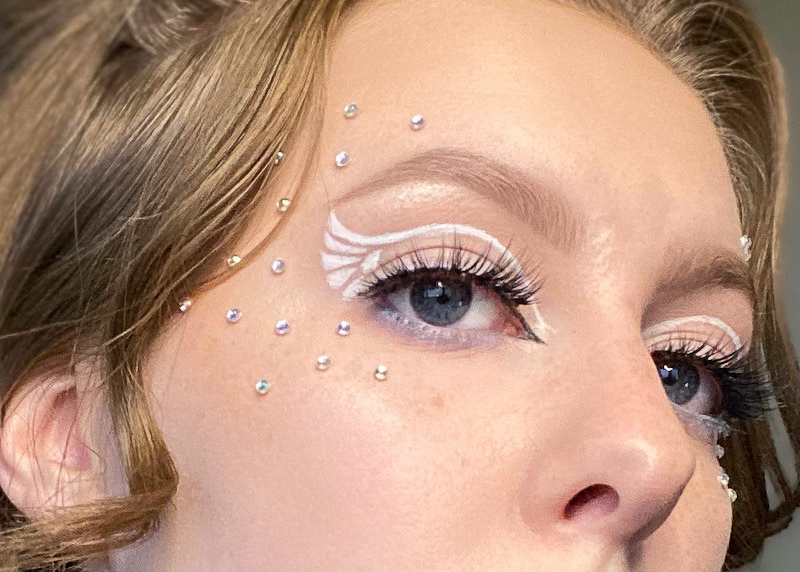
The hit HBO series “Euphoria” blew up the makeup world in 2019, and it looks like the trend of incorporating jewels into makeup is here to stay. This is another graphic liner look that is a bit trickier than the spider web, but the end result is really cute and makes for a little bit of “oomph” if you’re wearing an angel costume this Halloween.
I started by lining my top lash line with a very, very thin black line. I didn’t bring it out like I normally would with a classic cat-eye liner, but I did drag it into my inner corner to once again elongate my eyes. Then I used a white liquid liner to cut my crease, flicking it upwards on the outer corner to create the top portion of an angel wing. I created four little pointed rectangle-like shapes on the outer corner of my eye, trying to keep the angle similar on each one to form a wing. It can be a bit tricky to get the shapes just right, but if you use a light brown eyeshadow to map things out before going in with eyeliner, it can make a world of a difference and you can avoid further frustration.
I put a light blue eyeliner into my waterline and smoked it out into my lower lash line to add a bit of colour to the look. Finally, I used a bit of lash glue and some jewels from a local craft store to add some sparkle!
Products used:
Suva Beauty Hydra Liner in shade Doodle
NYX Epic Wear liner stick in shade Chill Blue
Sephora “Vivacious” false lashes
L’Oréal Paris Voluminous Lash Paradise mascara in shade Blackest Black
Anastasia Beverly Hills Brow Wiz in shade Medium Brown
Rare Beauty Liquid Touch Weightless Foundation in shade 130N
e.l.f. Cosmetics Hydrating Satin Camo Concealer in shade Light Warm
Maybelline Fit Me! translucent loose powder
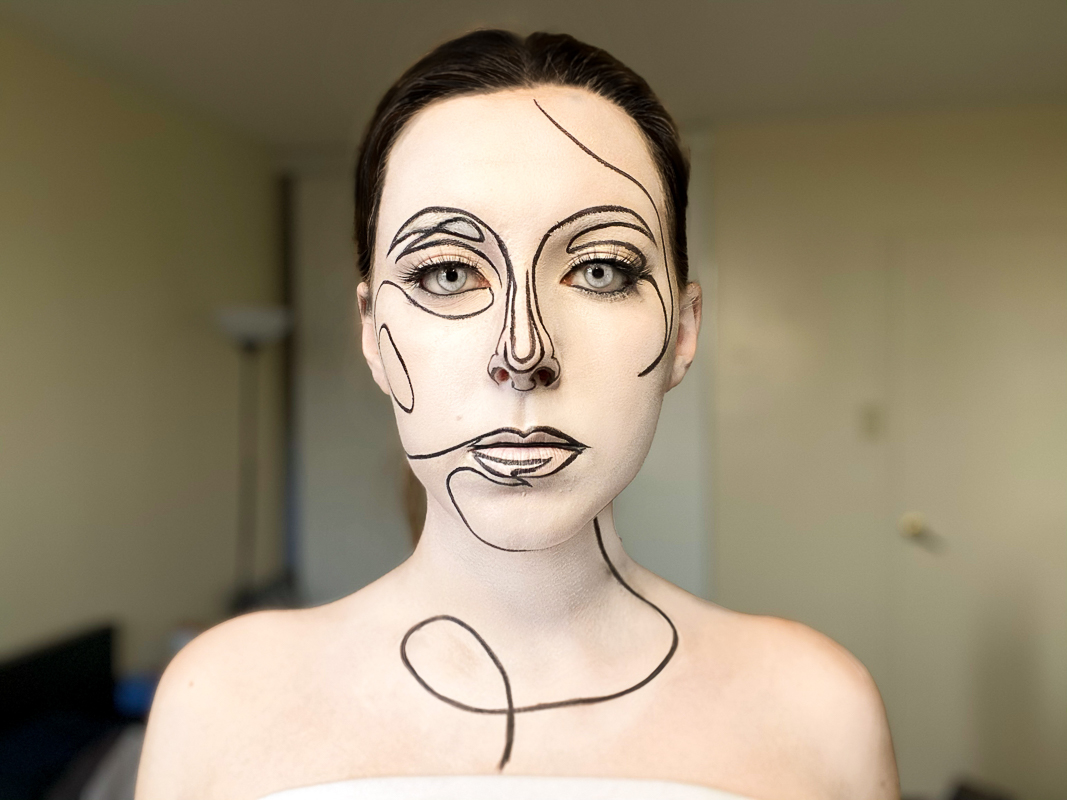
Alright, alright, alright. I know this looks difficult. It can be a little annoying, I won’t lie. I’m personally obsessed with art pieces which only contain one line. The ones of faces in particular really intrigue me, and I was curious to see how it would look on an actual face. The answer? SO cool. And honestly? Easier than it looks.
You definitely will want some face paint for this look, as you’re going to be covering a major part of yourself in white. You could use another colour, but I used white to ensure the black lines would stand out. I used online art as a reference and found this to be the easiest route as it allowed me to know exactly what I was doing the entire time.
Covering my face, neck, ears and shoulders in white face paint, I set all of it with a translucent powder (because this WILL crease and separate a TON if you don’t). This made a really nice, smooth base to work with. I then went in with a small angled makeup brush and a light grey eyeshadow to carefully draw where the lines would go. After I had the lighter lines drawn, I held my breath, prayed a little and went on top of them with a black face paint. Eyeliner would work for this too, but because those can sometimes drag the skin if they start to dry out, I opted for face paint with a small detailing paint brush. I covered up any mistakes with white face paint as I went on, set the black lines with a black eyeshadow on a small angled brush and completed the look with some dramatic false eyelashes.
Tip: To really make this pop, block out your eyebrows with a glue stick and translucent powder! A trick beloved by drag queens everywhere, it’ll flatten your brow hairs onto your skin and really smooth out the “canvas” you’ll be working with. I would also recommend a black wig and white contacts to tie everything together —mine are edited in the above photo.
Products used:
NYX SFX Crème Colour face & body paint
Sephora “Vivacious” false lashes
A fun and inexpensive Halloween look
Remember that you don’t need to pay for a trendy new costume every Halloween. Sometimes, you can make some serious magic happen with the products already in your makeup bag.
Featured image by Miranda Caley


